Keep updated our servers is one of the most important tasks that all the IT admins should follow. The small companies, in general, use WSUS because it’s free and very easy to use; the medium-large companies use System Center Configuration Manager to maintain the infrastructure safe and protected. This is true when the servers are on-premises but what happen when our infrastructure is on the cloud?
It’s not impossible imagine to have WSUS as virtual machine or a SCCM secondary site on Azure but this means increase the effort and the complexity that, in some cases, could be unnecessary.
To achive this goal, Microsoft has been released a new service called Update Management with the scope to keep updated our Azure virtual machines. I’ve already wrote about it (Operations Management Suite: Update Management) but in the past the solution was poor and integrated with OMS; now we have a full integration with Azure and new cool features.
Patch Single VM
Update Management service must be enabled and it’s possible do this per single VM or per all VMs present into the Subscription – figure 1.

Figure 1 – Update Management Enable
As you can see, to turn-on the service, it’s required a Log Analytics Workspace and also ad Azure Automation Account; all of these services can be enabled for free (with limited features).
After few minutes you will be able to see the virtual machine status, figure 2, with the available updates and the missing one.

Figure 2 – Missing Updates
To create a new update plan, click on Schedule Update Deployment to be redirected into a new blade dedicated to this area – figure 3.

Figure 3 – New Plan
Assign a label without forget to use a good naming convention because you must be able to recognize the scope after months, without open each plan. After this, chose what kind of updates apply: the figure 4 shows the actual classes; for example, it’s possible select only the Definition Updates, this means keep Windows Defender always updated with the latest signature, without impact the productivity.

Figure 4 – Update Classifications
Thanks to Exclude function, it’s also possible avoid installation for a specific patch (maybe because is not compatible with your application or just because is not stable).
Next step is set the schedule time, figure 5, when deploy the updates: you can choose between One-Shot mode or Recurring and thanks to granularity for the timing, we are able to run the scan every one hour (perfect to update Windows Defender).

Figure 5 – Scheduling
The last step is probably one of the most important, figure 6, because we must define the Maintenance Window and the Reboot Options. Set a wrong value into the first field, means avoid the restart with the consequence to keep the machine with a pending reboot. Microsoft suggest to set at least 30 minutes + 20 minutes for the VM restart, my suggest is set 60 minutes. Also the second parameter is important because if you decide to apply the updates during the business hours, the reboot can generate a big issue.

Figure 6 – Reboot Options
Schedule Status
The list of updates cycles is reported into the section Update Deployments, figure 7, with a detailed panoramic about everything during each plan. You can also drill-down into each row, to see what happened – figure 8.

Figure 7 – Report
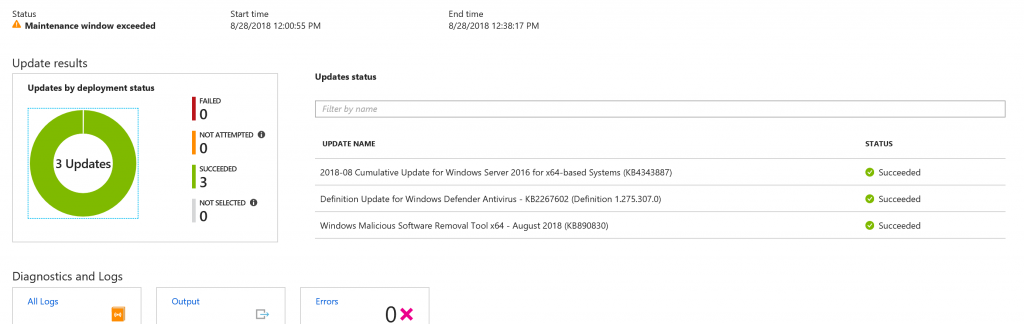
Figure 8 – Drill Down
As you can see from the picture, the Maintenance Window has exceeded so the updates were applied but the VM was not rebooted to avoid production stops. To resolve the problem, in this case, it’s necessary extend the value parameter.
Patch Multi VM
The multi-VM patching is similar with the previous steps with the only difference that we have the list of all virtual machines inside the pool, with the status for each object – figure 9.
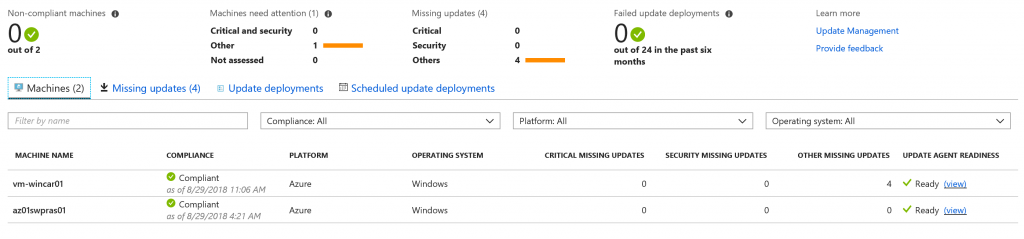
Figure 9 – Multi VM Management
Another difference is inside the update plan, because we have the possibility to select what machines add into the plan, figure 10, and thanks to the integration with Log Analytics there’s a way to import a machine from AD/SCCM/WSUS.
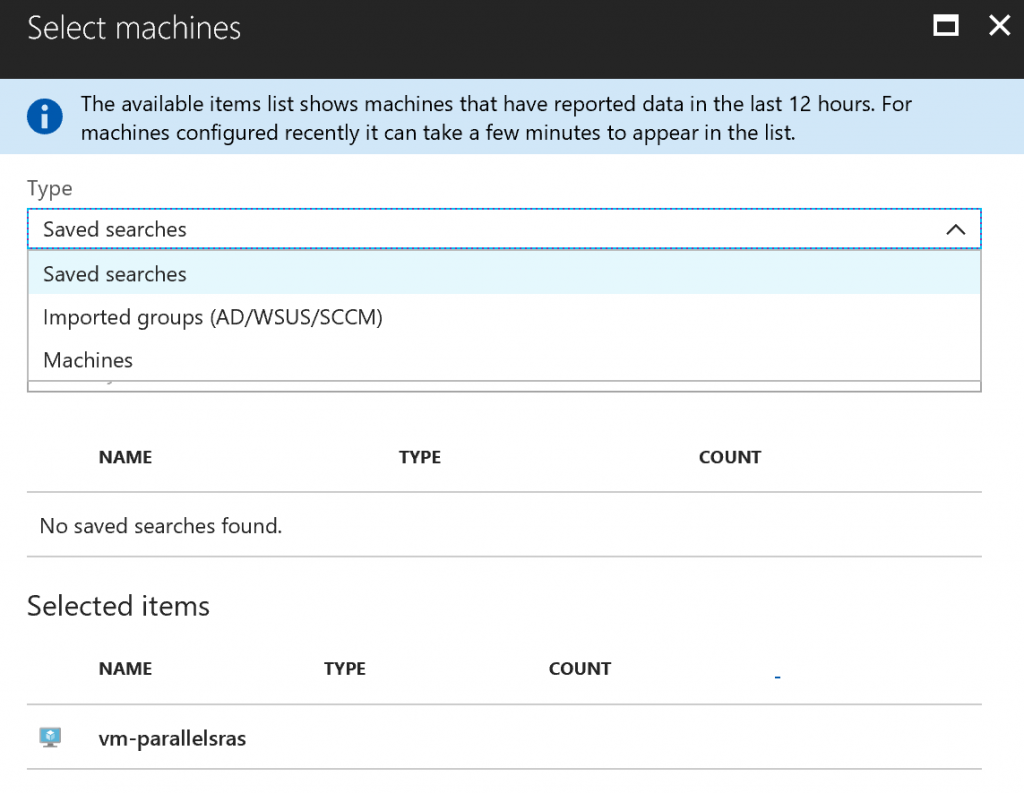
Figure 10 – Select Machines
The reporting are the same in general, with a little difference when we do the drill-down because there’s a full detail not only about the updates but also about the machines inside the pool – figure 11.
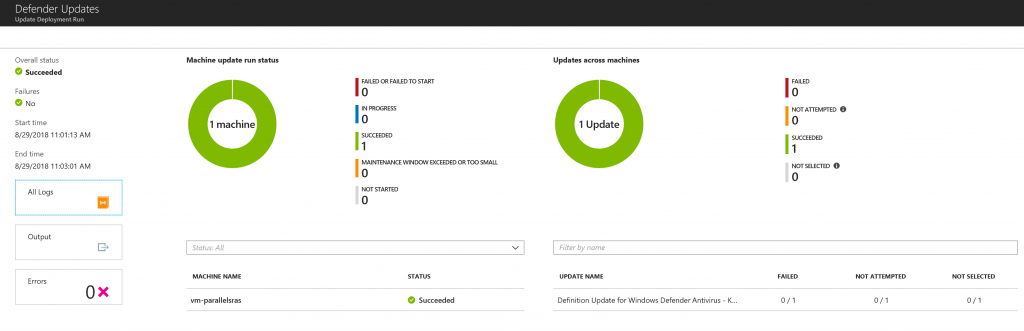
Figure 11 – Drill Down
Maintain the Pool
In case you want add more Azure VMs inside the pool, click on the button Add Azure VMs to be redirected into the dedicated area, figure 12, to insert new machines.
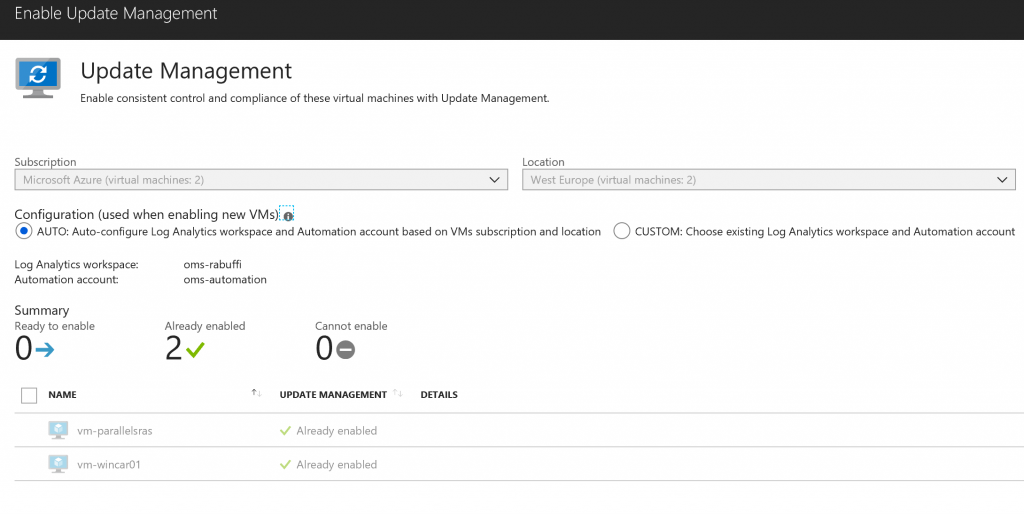
Figure 12 – Add New VMs
Conclusion
Update Management is absolutely one of the coolest tool to keep updated our servers, without implement services and increase the effort. The possibility to select the classification, the schedule time and the reboot options make UM a great solution for all companies. As usual for Azure services, we must expect new features for next months to improve the patching automation.